
|
|
Trinketbox 1 tutorialand I am using a different picture than the one above.. I made this graphic in PaintShopPro5, and you will NEED some GENERAL KNOWLEDGE of the PROGRAM to make this graphic. It can be made in PSP6 and PSP7. I did use a filter that doesn't come with PaintShopPro, EyeCandy4000 to get some effects. As to whether you can achieve the same effect without this program, I am sure if you use your imagination you could. I recently went into PSP6 and PSP7 and tried to get the same effects on the border without EyeCandy4000. Follow the instructions on this page for everything else, and here is a page of Instructions using PSP6 and PSP7 filters for the borders effects. 
This tutorial is written specifically on how I made my trinketbox.  You need to start with the image or images YOU want to decorate your trinket box with. The size doesn't matter as we will work from the original picture. We are going to build the beginning of the frame with this picture, so to save the original, press SHIFT + D, to bring up a new copy to work with. You are going to need 3 of these, so press SHIFT + D two more times. Now is a good time to name each picture and save them. I named mine cg_trbox_1, cg_trbox_2, cg_trbox_3. (I keep it simple and organized) I wanted to add a little something to my front picture, so I added a border, and painted it with a gold tube, using the Tub Tool. This step is entirely up to you. If you would like to do this, as I did, go to IMAGE, ADD BORDERS. When the window opens up set to the size you would like, keeping it small. I set mine to 2. I also have my background colour set at black for the next step.(Having a black background was easier for me to select with the Select tool). 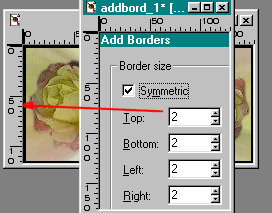
Now we want to highlight/select the border to paint just it. We will use the Magic Wand Tool. 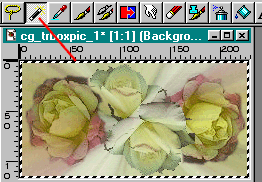
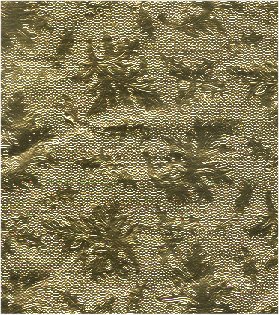
Now we have the marching ants around the border. goldfoilpaper This is a jpeg file, click to view...it is large. Save this image to your hard drive, take it into PaintShopPro and export into a tub to paint with. 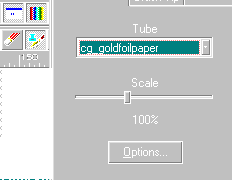
Open your tubes, select cg_goldfoilpaper tub and paint the marching ants on your pic with the tub tool. 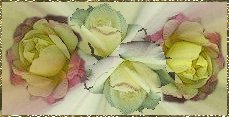
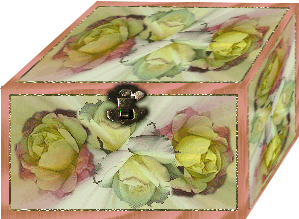
And your picture has a gold sparkle frame like this. Now to start the box. I chose to put a frame around the first picture and work from there. Go to Image, add borders again. Only this time set the border setting at 8 Again we use the select tool and select the border. Next I used Eyecandy 4000, Wood, with the following settings. 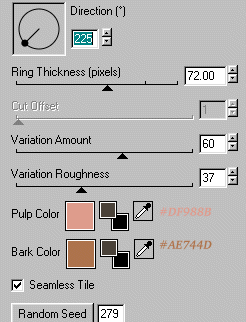 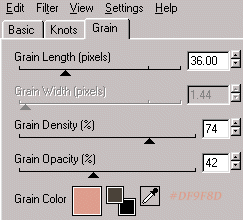
(I added the colour code, that I used, on the displays with the text tool. You may choose to use different colours for yours.) And now you have this 
Turn off marching ants, (CONTROL + D) and copy Open a new image 400x400, transparent backgrnd Paste copied image as new layer, 3 times. Save this picture This is what I have now... 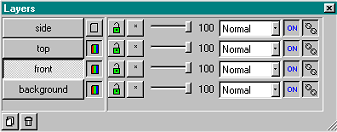
I gave each picture a name, front, top and side. Now we have to put the top and side into perspective to make the box. Turn off the side pic. And select the deformation tool 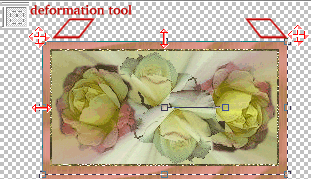
When you press Shift + click on the corners of the picture, you will see the little box change to a slant, now you can change your picture to slant to the right or left. 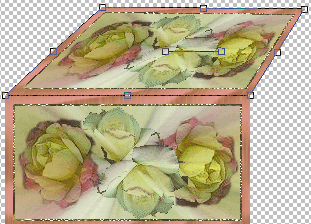
You can make this smaller, just play with the deformation tool until you get the width you want. And now for the side. Do the same at the top. Turn on the side layer, apply the deormation tool as we did with the top until you get the effect you want. This will take some playing-with. And here is the result. 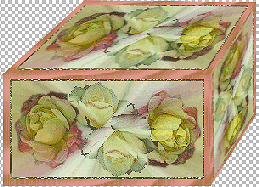
I did this quickly, for this tutorial so you may work a little harder to get a smoother effect for the side. Now for the latch. Save this image to your hard drive. It will look nicer once you upgrade by choosing increase colour depth to 16 million, 24 bit Be sure to be working with the front layer. 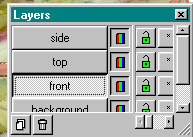
Add new layer, and name it latch. Your layers box should look like this now. 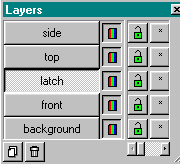
You will put the latch on the front pic, but you will find the top will overlap, 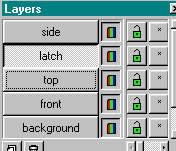 to get this effect 
And here you are. 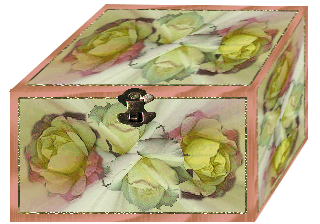
I did one more thing with my latch though... if you would like to try it... here it is.. 
I did this with Eye Candy 4000 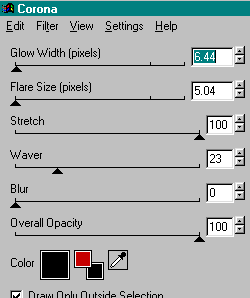
Now use the Selection Tool and draw a sqare around the box you created. Go to Image and then Crop to selection and you will have a nice sized image Now you merge all layers and there you have it. So there you are. My first attempt at writing a tutorial. I hope you find this a simple recipe to making a trinket box. You may find short cuts or easier ways to do some of the steps. This is how I made my first one though. Have fun with it.

EMAIL US HERE We appreciate hearing from you, how you like or dislike this tutorial. since January 14, 2001 View Our Guestbook  Sign Our Guestbook

Back to Blue & Shadows Mom, homepage 
 
|